A standard is a physical or material presence of a unit. A standard is set up and established by authorities as a rule for measurements of quantity. A standard plays an important role to support the system for measurements throughout the world.
Line Standards:
Line standards are calibrated by comparing the given standard with a master scale in an optical comparator. Line standards are quick and easy to use but they are not that accurate. It is limited up to ±0.2mm. For high accuracy, scales have to be used in conjunction with microscope. The accuracy of line standards is depending upon the skill of the operator. It is subjected to parallax error.
End Standards:
End standards are defined as the distance between the end surfaces of the material standard. End standards are very commonly used in laboratories and engineering workshops. Highly accurate for measurement of close tolerances up to ±0.001mm. End standards can be made to a very high degree of accuracy. It is not subjected to parallax error.
Wavelength Standards:
Line standards and End standards are material standards, which are subjected to destruction and their dimensions vary with time. Wavelength of light is introduced as standard of measurement, which is highly accurate and very small unit of measure. This standard is easily available to all standard laboratories and industries. It can be used for making comparative measurements of much higher accuracy.
Angular Standards:
The basic unit of angular measurements is the right angle. It is defined as the angle between two lines, which intersect to make the adjacent angles equal.
Slip Gauges or Johansen Gauges:
The slip gauges are used as standards of measurement for checking the accuracy of measuring instruments such as micrometers, calipers, dial indicators, gauges, etc. Slip gauges are invented by C.E. Johansen from Sweden. It is also called as Johansen gauges.
The slip gauges consists of alloy steel rectangular blocks about 30mm x 10mm x thickness in dimension which are hardened and quenched before finished to required size. The slip gauges are made in five grades, in the ascending order of the work accuracy. The slip gauges are available in the five grades which as Grade II, Grade I, Grade 0, Grade 00, Calibration Grade.
The slip gauges are high precision measuring device and are heat-treated to resist wear and to achieve good hardness and are grounded roughly. They are used as height standards in the measurement of parts.
Comparators:
Comparator is a device which picks up small variation in dimension, magnifies it and then displays it by using indicating devices to compare with some standard values. Comparators are precision instruments used for comparison of parts as well as working gauges and instruments with standard precision gauge blocks.
The most common types of comparator are used as:
- Mechanical Comparators.
- Pneumatic Comparators.
- Optical Comparators.
- Electrical Comparators.
- Electronic Comparators.
- Mechanical Optical Comparators.
Requirements/Characteristics of good comparators:
- The instrument must be robust in design and construction.
- The magnification of the instrument should be high.
- It gives highly consistent results.
- Comparator requires less skill of the operators.
- The pointer of the comparator should require coming rapidly at the rest.
- Indicator should be provided with the maximum compensation for temperature effects.
Applications of comparator:
- It is used to check the components and new gauges.
- It is used for final inspection of gauges.
- It is used as laboratory standards.
- It is used as working gauges.
Dial Indicators:
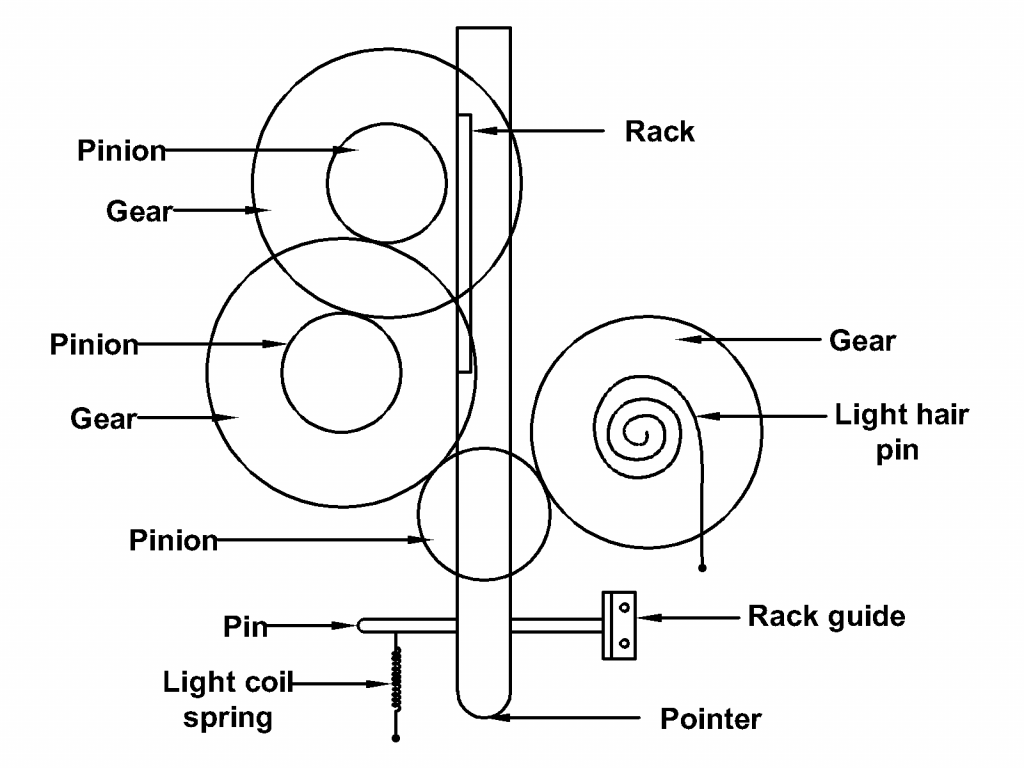
Dial indicators are small indicating devices containing a scale and contact plunger. The movement of plunger is magnified by gear and pinion mechanism.

It consists of plunger which slides in the bearing and carries a rack on the inner end. The rack meshes with pinion which drives other gears and pinions. The linear movement of the plunger is magnified by the gear train and transmits to pointer on the dial scale. The pointer is mounted on the spindle of the pinion. The light hair spring is attached to the gear to take up the backlash.
Applications of Dial Indicators:
- They are used to checking linear measurements.
- They are used for an inspection of precision machine parts.
- It is used in alignment test of machine tools.
- It is used to check the roundness, parallelism, etc.
- It is used with sine bar in angle measurement.
Advantages of Dial Indicators:
- Simple in operation.
- Easy to use and easily readable.
- Compact and robust in construction.
- Cheaper and easily available.
- No need of power supply.
Disadvantages of Dial Indicators:
- Less accuracy due to moving parts.
- Wear of plunger bearing surface.
- Parallax errors are introduced.
- Range of instrument is limited by range of fixed scale.
Pneumatic Indicators:
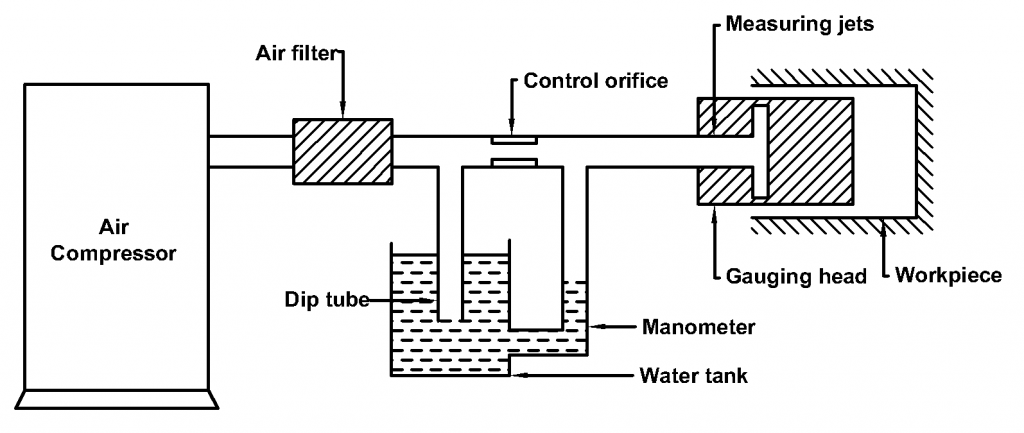
In pneumatic comparators, the variation in the dimension being measured with respect to the dimensions are shown and amplified by variation in air pressure or velocity of air flow.
It consists of vertical cylinder filled with water at a certain level and a tube is dip up to depth corresponding to the required pressure. A manometer is connected between cylinder and control orifice.

When the air pressure is higher than the desired pressure, some air bubble out from bottom of dip tube and air moving to control volume will be at desired constant pressure. The constant air pressure passes through control orifice and out from the measuring jet. In no restriction when the air is out, the level of water in manometer tube will coincide with that cylinder. The restriction of the air out depends upon variations in the dimensions to be measured. The variations in the dimensions to be measured are converted into corresponding pressure variations which reads from the calibrated scale on the manometer.
Advantages of Pneumatic Comparators:
- High degree of magnification.
- It can be easily handled by the semi-skilled worker.
- It is very suitable for measuring diameter of holes.
- Accuracy is more due to less moving parts.
- No wear and less inertia.
Disadvantages of Pneumatic Comparators:
- Limited range available.
- This is not much portable.
- Need an external power source.
- Low rate of response.

